Recently Airtel a leading private ISP in India announced the first ever 8 Mbps ADSL plans for Bangalore.
This step is in right direction. Personally, I'm happy with MTNL 2 Mbps plan. At work we have 155Mbps x 3 connections so I never worried about bandwidth.
The cost is as follows according to official website: => 4 GB limit/month INR. 1299 => 8 GB limit/month INR. 2222 => 20 GB limit/month INR. 4444 => 50 GB limit/month INR. 9999 => 100 GB limit/month INR. 19999
I wish it was bit cheaper, I need 20 GB plan around INR . 1500. Currently service only available in Bangalore and Chennai city.
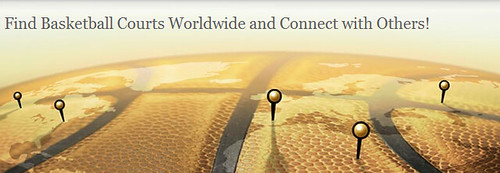
Nowadays, people frequently use online maps to locate their favorite coffee houses in the vicinity, rather than just wasting time to roam around their neighborhoods to find one. Besides searching for coffee houses, a German developer has came up with a brilliant idea and created a website called Courts of the World (COTW). COTW is a a directory of streetball courts whereby it enables users to find basketball courts worldwide and connect with others by posting their courts along with related videos and photos.
Most people create web applications because of an idea coming from a personal experience and the main developer of COTW is not an exception too. According to his true story, “Back in the summer of 2006, my brother (known around here as CG) found himself somewhere in Shanghai, looking for a court where he could check out the local competition. As you can imagine, my brother spent a lot of time in the streets of Shanghai looking for courts, and very little time playing. Back home, he got thinking: Why wasn‘t there a website that told you where to find Streetball courts anywhere in the world? How good the players were? How to get in touch with them?”
The main objective of COTW is to allow users of their favorite game (Basketball) to interact with each other and share their personal experiences about the sport on the web. By signing up for an account, users can create their own personal profile pages, add their courts and locate them on a map for others. What’s more is that it also functions like basketball social networking site whereby players are able to comment on a court, post pictures or even embed YouTube videos of their courts.
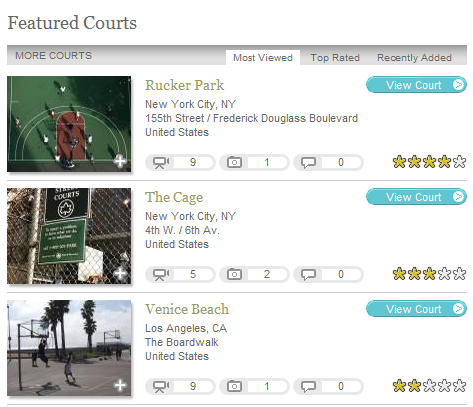
If you simply just want to look for basketball courts, you can do so by making a visual search on a Google Map. However, the downside with this search is that there are not many courts shown on the map (only 81 worldwide) due to the small community. Therefore, only popular basketball courts added by members will be revealed. Currently, the best rated courts includes Rucker Park, LTU Arena, The Cage, Sporthochschule and Venice Beach.
I feel that COTW is indeed an unique invention as it really helps you to relieve your frustration of finding basketball courts or even players when there is a shortage of busy friends to play with.
Microsoft has planned a Ad Campaign ranging between 80 Million Dollars to 100 Million Dollars. Now if you are thinking this campaign is for Windows, then this time you are wrong, It’s Bing, Microsoft’s Search engine with which Microsoft hopes to compete with Google.
In a Discussion with Various Experts most of them said that advertising wouldn’t help Bing to get loyal users. Pre-iPhone, People were unaware of those Multi Touch screens, those applications but advertising with focus on these new features made the ad campaign and the product a success and Microsoft also aims to have such an effect by giving users a reason to shift from Other search engine to thiers.
Till now, Not any campaign of this magnitude has hit Google so predicting it’s success or failure now would not be of any use.
TotallyFreeCursors.com is a free library of cursors. The site offers you to download free cursors of various types which can be used on your computer. The site allows you to browse through various types of cursors and lets you pick the ones you need. You can also get code and embed them on your profiles of MySpace, Forums etc .
Navigating through the site is very easy as the collection of cursors are categorized according to their type. You will also find Today’s hot cursors and New and requested cursor section to select the best cursors. You can even search for the type of cursors you want. This Free cursor archive lists around 7000 free to use cursors.
Password protection of your PDF file ensures that the PDF can only be opened by the intended recipient of the file. Password protection can also be used to prevent users from printing or editing the document. These settings can be further tweaked to allow only low resolution printing, and varying degrees of editing.
To password protect your PDF document in Adobe Acrobat Reader, go to Advanced > Security > Encrypt With Password. A prompt will appear asking if you are sure you want to change the security settings. Click on Yes. Select Encrypt all document contents, check Require password to open document, and enter the password in the “document open password” field. If you want control on the permissions to print and edit the document, check Restrict editing and printing. Provide the password for changing these settings. Make sure Enable copying of text, images, and other content is unchecked. Click on OK.
A prompt will appear asking you to confirm the passwords you have entered. Another prompt states clearly that not all third-party programs respect the security settings in the PDF file. Third party software for bypassing these security settings are easily available in the net.
Blogger has always been one of the greatest (if not the best) Free Blogging platforms available on net with so many features like unlimited bandwidth, lot of templates, multi image uploading,etc. Its always nice and interesting to know how Blogger looks like in the past. So, in this post, we attempt to bring you back in time to look at how blogger look like in the past and then scan through it's history with images.
Blogger was created by Pyra Labs and was launched on August 23, 1999. It was one of the earliest blog publishing tools and it is credited for helping popularize the format. Here is it's design then..
Blogger.com in 1999
Blogger.com in 2000
Later, Blogger was acquired by Google Inc in the year 2003 and changed their design in 2004 and also added some cool features like Image uploading (via Picasa) , comments, drag and drop widgets, individual archieve pages for posts,etc.
Blogger.com from 2004 - Now
And also Blogger supports Google Adsense which generates revenue for the webmasters.
Here is how adsense website look like in the past.. (year 1998)
Is Blogger going in the right direction..? Share your thoughts!
How much of your 7 GB (and growing) Gmail mailbox are you really using? Gmail Drive is a simple Windows shell extension that lets you use your Gmail inbox as online storage. You simply give it your Gmail username and password and you’ll find another hard drive listed under My Computer. When you upload a file, it appears as a new e-mail in your inbox.
To avoid the hassle of seeing a new e-mail every time you upload a file, you can create a filter in Gmail that archives all such mail (the subject line contains “GMAILFS”). It may not be the most extensive tool ever made, but Gmail Drive is the best way to use all that free space that Google has so generously given us all. Happy Storing..!!
Every now and again, your hard drive is bound to get clogged with photos that you’ve taken and it is a good idea to keep backing them up from time to time. Picasa gives you the option to burn your photos on to optical discs. To do this..
Go to Tools > Backup Pictures,
Select New Set and give a name to it.
Also mention what formats you want to save and if you’d like to save the backup into a different folder or a network drive by clicking on Disk-to-disk backup.
Click Create to finish.
Now check the checkboxes for the folders and albums you want to backup and select Backup.
In the location that you backed up the photos, you’ll find PicasaRestore.exe, which you can run to restore the images to the original path.
Picasa also has a Gift CD feature which you can use by following this procedure.
Go to Folder > Create a Gift CD.
Click on Add More to add more folders to the gift CD.
Select the resolution for the photos using the Photo Size drop-down menu and give the CD a name.
Creating personalized post cards or photo gift cards has become the flavor of the season. Most of the popular e-cards site provide you with an option to customize your own holiday postcards. But all you can do on the websites is add your images. With the help of this mini work shop, you can learn to personalize your photo card for every occasion, along with the perfect text. In order to make orcreate your own photo gift cards..
Download Photo-Card-Maker from this link. by Clicking on “Save File”. After downloading, Double-click on “PhotoCardMaker.exe” to install.
Start the application. Click on “Select Template”. Select a template through the “Category” drop-down menu. Click on a template in the main window. Click “OK
To change text on the card, click on “Text”. You can add new text, change the font face, size and color on your card. You can clear out the text by clicking on “Delete”
You can place personalized images on every template. Click on “Photo”. Browse and open the image. Scale it according to your requirement. Click outside the image.
To make changes in the future, click on “Template” and click on “Save Template”. Your text elements will be preserved, but your image will be discarded.
To save the card as a *.jpg image, click on the “Save” button. Browse for the location, and type an appropriate file name. Your card is ready to be mailed.
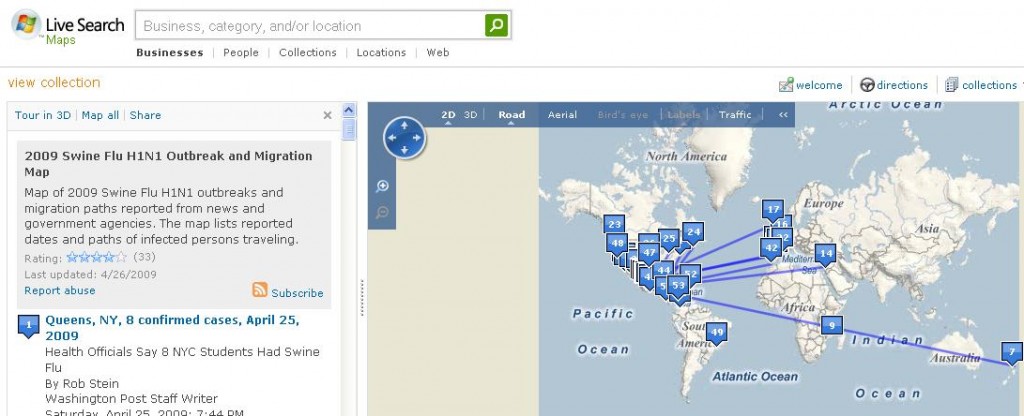
It is very sad that a virus by the name Swine Flu is spreading rapidly. Many of you might be tracking how many more places are getting affected by it. I just came across a Live Search Map which highlights the reported cases. These reported cases contain news of both the confirmed and unconfirmed flavor. It allows you to track how the virus is spreading. To add to that it also shows additional data for each point on the map, for instance date, No.of cases and a link to the source reporting the incident.
Live Mocha is a site that adds the benefit of collective intellect in the form of social networking, to spice up your language learning experience. After registering on the site and confirming your e-mail address for authenticity, enter the languages you know and the languages you want to learn. Using Live mocha you can..
Learn languages online at your own pace with fun language lessons
Connect with foreign language partners around the world
Live Mocha shows you a list of users with the opposite needs. Say for example, you know English and Hindi, and want to learn German, then Live Mocha will show you all the native German speakers who want to learn English or Hindi. You get the best of both worlds. Not only do you get authentic advice on the language of your choice, but also get to make new friends, who give
Live Mocha brings you an easy-to-follow inbox, through which you can monitor exactly where you stand in your learning curve. You get to see users who’re learning the same language as you and users who speak the same language as you. This way, learning is easy and comfortable.
Customizing your favorite ringtones normally involves downloading a third party application to edit and crop audio files. This can be painstaking, time-consuming and even expensive. We already discussed how to make own ringtones using your favorite songs. Here is another good website called Makeownringtone.com, an online ringtone editing tool that simplifies the process of audio editing by means of easy-to-use tools and a basic user interface.
A great advantage of using this site to edit ringtones is that it supports multiple audio formats. The supported formats include MP3, AAC, OGG, MP4, MMF, etc. Here is an easiest way to make your own ringtones for your mobile phones online. ..
The first step is to upload an audio file for editing. Click the "Upload" button that can be found below the timeline.
In the dialog box that appears, select the file that you would like to upload.
Once the track is uploaded it will appear in the timeline as a waveform.
Click “Play” to play the track from the beginning.
A part of the audio file can be selected by clicking on a particular part of the waveform.
You will see two handles that mark the start and the end of the selection. These handles can be moved to adjust the length of the selected region.
You can play the selected part of the song by clicking the “Selected” button.
Before you download the ringtone make sure that you have selected the right format and the best possible BitRate. Click the “Make a Ringtone” button to create the ringtone. The ringtone file can be downloaded to your computer, sent to your cell phone or can be directly mailed to you
There are 3 modes which allow you to customize your ringtones. They are explained as follows..
EASY MODE:
This mode, as the name suggests, caters to basic audio editing needs of a user. This includes “Normalization”, a feature that amplifies the sound in the audio file and at the same time makes sure that there isn’t any unwanted audio. You can apply the “Fade” effect to the beginning, end or both of the song you uploaded.
ADVANCED MODE:
The Advanced Mode enhances the audio editing feature. Follow the same procedure as the “Fade” effect to apply the “No Silence” effect. The “Bass” and “Treble” effects can be applied to the file using the dropdown box and by adjusting the Frequency. “Reversing” inverts the uploaded audio file.
EXPERT MODE:
For additional effects to be added to your track click on the “Expert Mode” tab. “Pad” adds a silence break to the ends of the song. You can reject frequency bands to a certain level using “Band-Reject”. “Chorus”, “Echo” and “Reverb” effects can be added to any part of the audio track. Using the other effects available in this mode requires some expertise and knowledge of sound signals, their behavior and also the repurcussions of changing these settings.
Orkut, One of the best social networking sites available. It is very famous especially in countries like Brazil and India. These days, Orkut accounts are being hacked easily. This is happening due to the Ignorance of users. If you be careful during the Orkut Profilelogin process, you can stay away from the fraudulent sites which will steal your passwords and hack your Orkut Profiles. Here are some tips to make sure your Orkut account is secure and safe without possibility of getting hacked..
Make a Strong Password :
Always try to create strong passwords which are hard to guess. Avoid your phone numbers, pet names, birthday dates etc as passwords as they can be easily guessed. A password with numbers and alphabets like P($p1ac3 will be better. Also be careful while choosing your security question.
Never Share your personal Details :
Be very careful not to share your Orkut login information like username and password with anyone. Be very sure when entering your login information. Check whether your browser shows https://www.google.com/accounts/ServiceLogin?.
Never copy and paste code into your address bar :
Don’t copy any code into the browser, no matter what it claims to be able to do. The scripts may reveal your information to your friends. Its better to be on safe side avoid running unknown scripts.
Don’t download anything from Orkut :
Make sure you don’t download anything from Orkut, Especially files ending with vb or exe. They may be viruses which can infect computers. Remember that Orkut never offers any downloads
Avoid Clicking External Links:
Don’t click links which are not related to Orkut. The external links which are not verified by Orkut may lead to some phishing sites. So better be cautious.
Get a good Anti virus:
Antivirus is almost a must for every computer. Even the best Orkuteer can be a victim of phishing attack. Download, Install a good antivirus and scan your computer regularly to keep it safe. Click here to get Free Antivirus.
Stay away from External Applications :
Orkut has a number of applications and more number of applications are being added everyday. Do not prefer any external application for accessing Orkut as they may not be genuine. Only try to access the Orkut applications provided for you in the Application Directory and have fun.
These tips when followed will provide you with a safe and secure way to access Orkut and will make your Orkutting experience better. Remember its better to be safe than sorry. Happy Orkutting..!
YouTube, The popular video sharing site is used by many people all around the world. The basic requirement to view YouTube videos is a browser. Not anymore, Here is Sprink ,a standalone YouTube client for Windows Vista or Windows 7 which lets you search YouTube and watch your favorite videos in a window that’s not much larger than the video window.
This is very helpful especially when you are working on any other application and don’t want to miss the videos. The application makes it very easy to search, Play and pause the YouTube videos. There is also a 3d view by which you can view related videos.
In order to use this cool desktop application make sure you have Microsoft Windows 7 Beta (from Build 7000 - Build 7106) or Microsoft Windows Vista SP1 or above and .NET Framework 3.5 SP1, Adobe Flash Player installed. This is still under development and various features are expected soon.
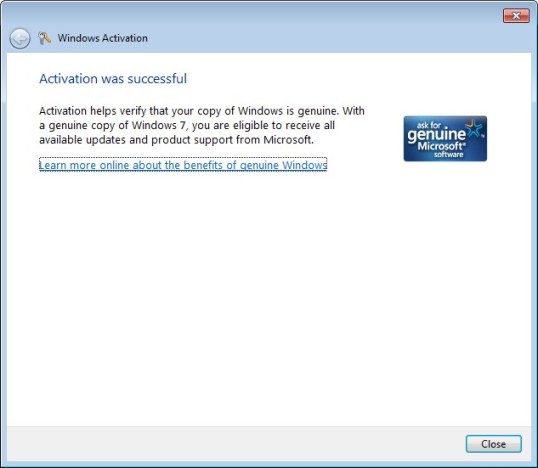
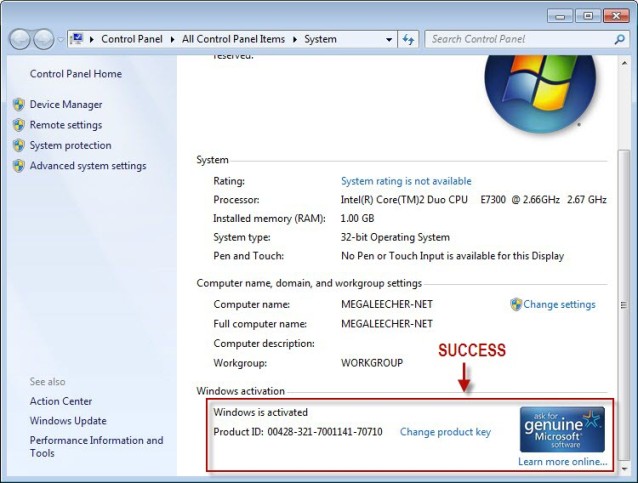
Windows 7 RC1 is now officially available for public downloading, the release candidate is set to expire on June 1, 2010 and will start to begin shutting down every two hours from March 1, 2010 you’ll need to install a non-expired version of Windows before March 1, 2010 to continue using it without expiration, after installing Windows 7 RC you have 30 days to activate your copy of Windows 7 online, you can follow the simple online activation process as detailed next for a fully functional genuine activated copy of Windows 7 till June 1, 2010.
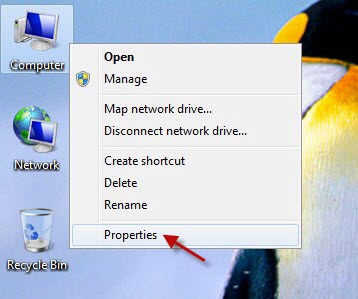
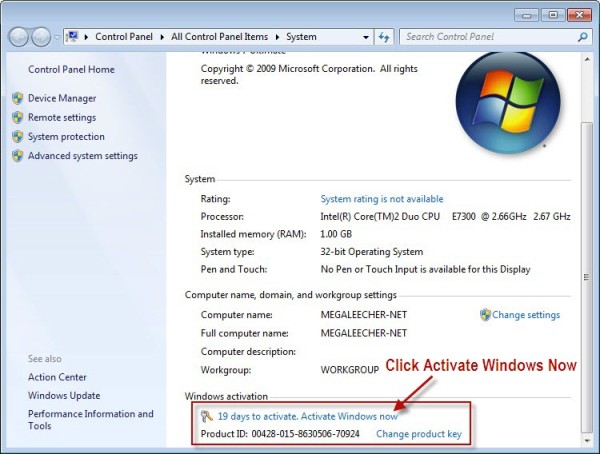
Once installed right-click Computer icon and select Properties.
Scroll to the bottom of page and click Activate Windows Now.
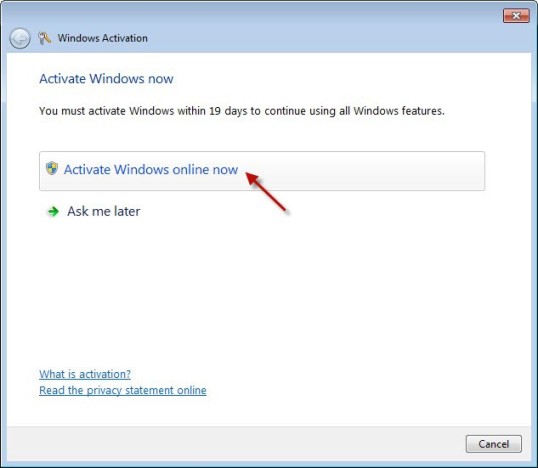
Click Activate Windows Online Now.
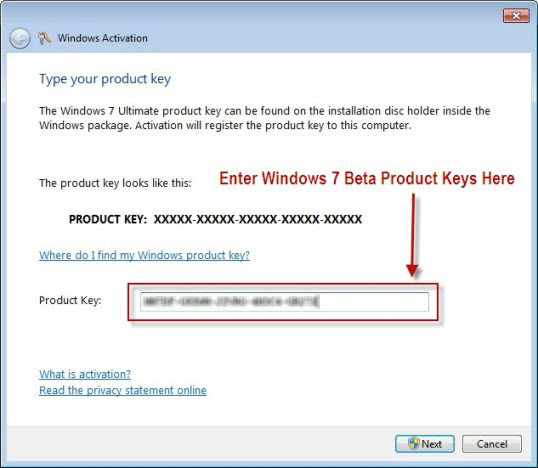
You will now need to enter your Windows 7 product key, you can get genuine Windows 7 Activation keys provided from Microsoft from here, copy any key and enter it as shown below, click Next to continue.
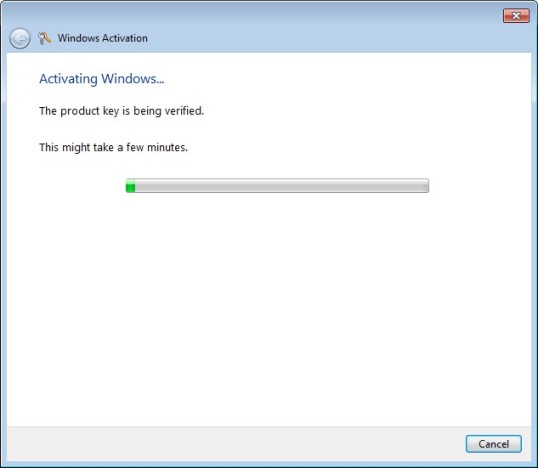
You must be connected to internet for activation to work, let the process finish.